Showing opening times based on the day of the week in Shopify
Back with another short tutorial. This time it is about showing text on your Shopify page based on the day of the week. This is ideal for stores that have a physical store and would like to show their customers that they’re open or closed on a specific day.
It is fairly easy to implement, although it took me some time to figure it out. Therefore I decided to share this step-to-step tutorial for whomever would like to use something like this.
# Step 1: Go to the ‘edit code’ part of your Shopify store.
Firstly go to the edit code part of your Shopify store. You can do this easily by clicking on Online Store > Action > Edit code.
# Step 2: Create a new file in the assets folder.
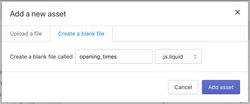
Create a blank file, give it a name and use the .js.liquid-extension.

# Step 3: Copy the Javascript code.
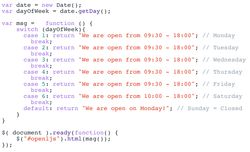
Go to this link, copy the code and paste it in the file you just created.
# Step 4: Change the text to your liking
The javascript file pretty much speaks for itself. You can change the text to your liking. Case 1 = Monday, Case 2 = Tuesday etc. Default value is what will be shown if the other cases do not match the day of the week.

# Step 6: Create a new snippet.
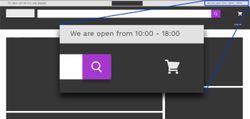
In the folder ‘Snippets’ create a new snippet and call it something like top-info-bar.liquid. We will display the opening times on this top bar as can be seen below.

Showing your custom text based on what day of the week it is.
# Step 7: Adding the content to the snippet.
Firstly add the javascript we created before by referring to it in the following way:
<head>{{ 'openljs.js' | asset_url | script_tag }}</head>
{% raw %}
After that you can create whatever top bar you would like. The one I used is by creating one div with class top-info-bar.
{% raw %}
<div class="top-info-bar"> <div id="left-ljs"> // You can put text or images here </div> <div id="mid-ljs"> // You can put text or images here </div> <div id="openljs"></div> </div>
{% raw %}
The left and middle part can be filled with whatever text, icons or images you would like.
The important part is the last div; that will be kept empty as it will get the data from the javascript we created before.
# Step 8: Add the snippet to your theme.
After we have created the snippet, this part can be used wherever you want. I have put it in the theme.liquid so it always shows on top of the page. You will need to place it after the body as can be seen below.

And that’s about it. If you have any questions, suggestions or other tips don’t hesitate to contact me. Have a nice day.